
DIY that I will be sharing is
very useful for all of us because due to this we can plan our day. Yes, I think
you all must have guessed till now that I am going to show you all how to
create your personal Planner. I have created this planner as per my convenience
and requirement. I have to keep track all the tasks to be done whether it is
any craft, daily activities, etc. that is this planner is made in that way
only. You can easily customize it as per your need. So let’s get started
without any delay.

Planner is just like a normal
folder with small compartments so for making it you will need any basic folder.
If the folder is of cardboard then it will be great but if it is of plastic
then also you can use it. Firstly remove the section in which sheets are
managed. The folder that I have used has total width 32 cm and total length
50 cm. Cut a strip of cardboard of length 32 cm and width 3 cm. Place this strip
across one side of the folder as this will be the flap to close the folder. Cut
out any floral sheet of width 32 cm and 53 cm length. Paste this floral sheet
inside the folder all over the inside surface including the cardboard strip.

Take any fabric to cover the
front and back of the folder. Cut 32 cm by 53 cm piece of that fabric and paste it
on outside surface of the folder. Seal the edges of the folder using a regular
tape. This will make your folder more secure and long lasting. Take Velcro and
cut small piece of it and paste one part in the middle of the cardboard strip
while other part side of the folder.

Outer structure of the planner is
ready now we will see the making of the internal parts of it comprising of two
pocket, one reminder pad, one note diary, planning diary and a blank plastic
sheet. Take a sheet and cut a piece of it following the measurements as shown
in the image below. Now score all the lines and fold them. Fold all the edges backward alternately like
first fold the first line from inside backward and second line outward. Follow
this for all the three sides of the bigger square. Now paste the last folded
edge of all the three sides on the folder. Follow the image for clear
understanding. Next take a plastic sheet and cut it in dimensions 26cm by
16.5cm. Take a small string and paste it on one side of the piece cut out of
the plastic sheet. Take another fabric and cut it in exact same dimensions as
we have cut the plastic sheet. Paste the two of them with strong glue. Paste
this just above the pocket that was pasted earlier. Take any embellishment or a
button and paste it on the pocket.

Take another plastic sheet and
cut it in dimension 9cm by 20cm. paste it just above the pocket leaving some
gap in between. Take a note diary and a florescent prompts diary. Paste them
using double side tape on the plastic sheet. We are pasting using double sided
as when any diary gets full it can be replaced easily without any hassle. Now
cut a strip of fabric of any dimension and fold it from sides by pasting them.
Roll the strip to form a small circle and paste this circle on plastic sheet.
It will be the pen holder in your folder.

Take another plastic sheet and
cut it in dimensions 22cm width and length 8cm on left or 16cm on right. Paste
this on other side of the folder at the bottom. Paste only the left and right portions
only. Use string glue like hot glue for pasting. Paste another plastic sheet
over this side covering entire portion as shown in the image. This can be used
to stick prompts and reminders.
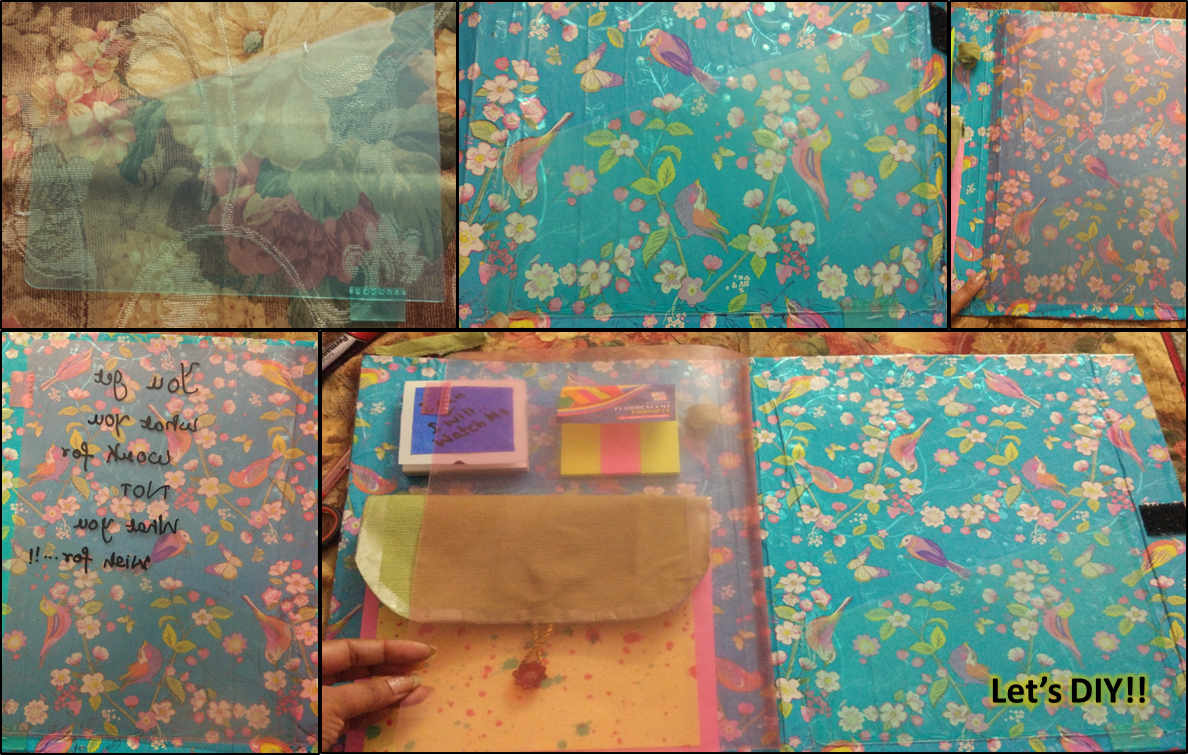
Cut a piece of plastic sheet of
dimension 20cm by 9cm. paste one side of this on the plastic sheet pasted
earlier. Take small string paste this behind this plastic sheet cut out such
that both the ends of the string remains free. Take any planner diary and paste
it using double sided tape at the center of this plastic sheet cut out. Lastly
tie the knot of the string over the diary.

Voila!! Your personal planner is
ready. You can write inspiring quotes here and there to make it more
interesting like I did. I have also kept
one notepad and a phone diary in the pocket. This planner has everything that
you will need while planning something. It is perfect for me as I have made it
that way. Try this to get your personal planner with your personal touch.
Happy DIY!!
No comments:
Post a Comment